I’ve shown this movement progression to hundreds of people over the years. It is without a doubt one of the most potent mobility exercises I’ve ever learned. When practiced regularly, it has the ability to improve movement in the hands, wrists, elbows, shoulders, upper back, neck and even help breathing become easier. I learned the first 2 parts of this combo during my Crossfit days. The second 2 parts I learned from one of my mentors, Carl Paoli.
History of pain education and 4 essential pain facts according to Lorimer Moseley →
The following are some key points from The Thinking Practitioner Podcast with Til Luchau and Whitney Lowe on February 7th 2024, Episode 111. How Bodyworkers Can Explain Pain (with Lorimer Moseley).
Twelve years ago, Lorimer Moseley’s TEDx talk “Why Things Hurt” helped to catalyze profound changes in how pain is conceptualized, in the massage and bodywork field and in many others. If we think about pain as protection, rather than as damage, it changes how we explain the improvements we see in hands-on work.
Moseley outlined three historical phases of pain education: Ancient, Old school and Current pain science. I’ve outlined them below.
Ancient pain education: Been around until turn of the century. Sometimes called Back school. Uses Anatomy and physiology, lifting and posture to explain pain along with some rudimentary advice on relaxation, structure and behavior. Moseley refers to this phase of pain education mostly useless and says it might do more harm than good, using the example of the concept of “slipped disc” as an example. He finishes this phase by suggesting it may be worse than useless.
Old school pain education: Currently the dominant concept. It’s often referred to as Pain neuroscience education. It started in the early 2000’s, probably along with the rise of fMRI. It involves Intensive education on the neurophysiology of pain. It’s good, not very good or excellent, but it’s better than useless, referring to it as didactic.
Current pain science education: Petal (pain education team of absolute legends), not sure if there was a joke I missed in here somewhere, but….Ha? Current pain science differentiates current strategies from neuroscience. Pain science education incorporates content and integrates strategies. Asking how to integrate with other models of care. What are the principles of content delivery? How do we evaluate if our delivery was useful? What are the easy wins? What are the mistakes that most people make that are making things harder? If this isn’t clear, he goes on to identify 4 essential pain facts.
4 essential pain facts: I’ve been looking for something like this for years and was excited write this out.
In a nutshell: Pain protects us and promotes healing. Persistent pain is also a protective function, many factors can influence pain, and therefore, there are many ways to reduce pain and recover.
1) Pain protects us and promotes healing – most people think pain detects pathology or danger. That’s not how it works. The evidence that pain detects damage is very poor. The evidence that pain occurs in order to prevent damage is very compelling. Decoupling pain from damage opens up all kinds of possibilities and raises all kinds of questions, presenting a lot of opportunities for intervention when we embrace this concept.
Concepts involved: Peripheral sensitization in the presence of injury and inflammation. Interpretation of a flare-up for example.
2) Persistent pain over protects us and prevents recovery – Persistent pain winds our system up. Through repeated protection, the protective systems are getting better at doing what they are doing. It’s bioplasticity or neuroplasticity across systems. Ongoing pain is also protective. The way synapses work at a cellular level (neuron to neuron and neuron to immune cell synapses), the more often we produce pain, the lower the threshold to produce it will become because our system learns how to do it better. We call this Allodynia and hyperalgesia. Neurophysiologically we call is a reduction in postsynaptic membrane excitablility. In consumer words, we call is pain system hypersensitivity. It’s not necessarily the pain system going wrong, this is how it works. It’s a normal response to an abnormal set of circumstances. Some may say it’s the pain system going wrong, which is a Moot point anyway because the threshold for what is dangerous has reduced so much.
Concepts involved: Central sensitization, Nociplastic pain.
3) Many factors influence pain – Pain, fatigue, muscle activation (stiffness or tightness). They didn’t cover it, but I am curious of now our personal narrative influences pain (I’m working on a separate blog for that).
4) Therefore, there are many ways to reduce pain and to slowly recover or to slowly retrain the pain system back to normal protective settings.
To summarize, Lorimer interated that teaching clients about pain is challenging. If you find it difficult, you are not alone. The concepts involved are complex and require patience and practice. In his experience, when the concepts of pain science education are received in a meaningful way, it can help create a profound shift and decrease in how pain is experienced in the body.
To view Lorimer Moseley’s TEDx talk: https://www.youtube.com/watch?v=gwd-wLdIHjs
To listen to the entire podcast: https://podcasts.apple.com/us/podcast/111-how-bodyworkers-can-explain-pain-with-lorimer-moseley/id1492004207?i=1000644465445
The Power of IV Therapy: Unlocking Optimal Health and Vitality
In recent years, the popularity of intravenous (IV) therapy has surged, captivating the attention of individuals seeking a convenient and effective way to boost their health and well-being. IV therapy involves the administration of essential nutrients, vitamins, minerals, and fluids directly into the bloodstream. Originally developed for medical purposes, this innovative approach has now found its place in wellness and rejuvenation centers. In this blog, we explore the usefulness of IV therapy and how it can contribute to overall health and vitality.
1. Efficient Nutrient Absorption: One of the primary advantages of IV therapy is the direct delivery of nutrients into the bloodstream. Unlike traditional oral supplementation, which can be subject to digestive inefficiencies, IV therapy bypasses the digestive system, allowing for optimal absorption. This ensures that vital nutrients are readily available for the body's cells and tissues, promoting overall health and wellness.
2. Enhanced Hydration and Detoxification: IV therapy provides a rapid and effective method of hydration, especially useful in situations where oral fluid intake may be insufficient. Proper hydration is crucial for maintaining bodily functions, promoting healthy skin, and supporting organ health. Additionally, IV therapy can aid in the removal of toxins from the body, helping to reduce overall toxic load. This can be a critical component of recovery from a number of chronic conditions.
3. Immune System Boost: A robust immune system is essential for warding off illnesses and maintaining overall well-being. IV therapy can be tailored to include immune-boosting vitamins, such as vitamin C, zinc, and glutathione which are antioxidants. These antioxidants enhance the body's natural defense mechanisms. By strengthening the immune system, IV therapy can potentially reduce the frequency and severity of infections, or may be used to treat chronic infections.
4. Energy Restoration and Performance Enhancement: For individuals seeking to maximize their energy levels and improve physical performance, IV therapy can be a valuable tool. IV infusions can contain essential nutrients, such as L-Carnitine, B vitamins and amino acids, that play a vital role in energy production and muscle function. Athletes, busy professionals, and those recovering from illness or jet lag can all benefit from the replenishing effects of IV therapy.
5. Rejuvenation and Anti-Aging Benefits: The natural aging process can lead to depleted nutrient levels and reduced cellular function. IV therapy can help counteract these effects by providing a concentrated dose of vitamins, minerals, and antioxidants directly to the cells. This rejuvenating effect can enhance skin health, promote a youthful glow, and potentially slow down the aging process.
IV therapy offers a range of benefits that can contribute to overall health, vitality, and well-being. With its efficient nutrient absorption, hydration support, immune system strengthening, energy restoration, and rejuvenation properties, IV therapy has become a sought-after treatment option. However, it's important to consult with a qualified healthcare professional to determine the appropriate IV therapy regimen based on individual needs. By harnessing the power of IV therapy, individuals can unlock their full potential and achieve optimal health and vitality.
For more information visit: aliveivandwellness.com
Body Language
While a lot of my bodywork approach is about mobilizing tissues and getting the body moving. An important integration component is refining proprioception. This requires reframing what you’ve felt in the past and redefining how it feels when you have more options for movement. People commonly use words like hurt, pain, tight and stiff. With bodywork, as your body experience changes, it’s helpful to update the words you use to describe that change. Look over the list below. Are there some words that resonate with you? Do other words come to mind? How can you integrate them into your body language?
Comfortable Balanced Freedom
Lighten Elegant Luxurious
Grounded Vigorous Motion
Easy Supported Stature
Feathery Graceful Poise
In contact Move Firm
Effortless Light Buoyant
Floating Facility Steady
Movement Strong Effortlessly
Free Buoyancy Smooth
Smooth Elegance Secure
Stability Mobility Rooted
Refining how you perceive your body can be subtle but powerful. Upgrade your language so it aligns with your bodywork experience and enjoy the effect it has.
ROM for the heart and lungs
It’s important to put your muscles and joints through their range of motion on a regular basis, why not the heart and lungs? Looking at the image below imagine your heart beating and your lungs breathing. See your lungs getting larger and smaller as your heart beats faster. Set an intention to get yourself out of breath everyday. Climb a hill, work in your yard, jump some rope, ride a bike, take a hike. Make it a daily practice to move your heart and lungs beyond their resting range of motion. Over time your heart and lung health will improve and you’ll feel more alive. Personally, there’s nothing like walking up a hill and feeling my body begin to breathe more deeply as it’s demand for oxygen rises. I also love the feeling of it all coming back down. If you don’t know what I’m talking about, then it’s been way too long.
Break a sweat everyday. Get your heart rate up everyday. Run out of breath everyday. What else is there to say?
Resiliency, bounding and springiness
On February 8th I wrote a blog called, Intelligently curved, where we investigated the curves in the bones of the legs and suggested they are designed to be springy. How can we tap into this springiness? I think jumping rope is an excellent and often under appreciated way to develop resiliency and springiness in the body. Additionally, it burns a ton of calories, improves coordination, builds stronger bones, reduces risk of injury and boosts heart health. A good jump rope costs about $10.00 and can be done just about anywhere.
Jumping rope is considered a low-impact, high intensity exercise. It’s easier on the joints than jogging or running and since most of your major muscle groups are working when you jump rope, it is considered thermogenic (it creates a lot of heat in the body). Your body needs to burn more fuel to produce this energy, so it burns a lot of calories. Within the first couple of minutes of jumping rope, your heart rate will rise immediately and have to maintain the amount of energy produced for the muscles. This increases caloric burn as well as challenges the body’s different energy systems.
Jumping rope improves coordination, balance and motor skills by requiring several body parts to communicate in order to complete one movement. The feet need to jump in time with the wrists rotating in order to create a continuous jumping motion. When you coordinate upper and lower body movements you become more agile and your body awareness improves, making you less prone to injury.
Your cardiovascular system will improve within the first two weeks of jumping rope. It’s beneficial for people who are at risk for cardiovascular disease and reduces high blood pressure. Your resting pulse will improve and overall body fat will decrease. This all contributes to heart health.
Although low, impact through jumping rope for 10 minutes a day has shown to increase bone density. The body responds to the stress of jumping by remodeling the bones to become stronger and more dense.
Here are a few recommendations to integrate jumping rope into your life:
Jump rope for 10 minutes to warm up before any exercise
Tabata jump rope: 20 seconds on, 10 seconds rest for 8 rounds (4 minutes total)
Complete three minutes of jump rope between rounds of weight training
Do 60 seconds of speed or trick jump roping between exercises like push-ups or sit-ups
I’ve jumped rope on and off for the last 10 years. Three months ago I started doing it 15 minutes a day 5-6 days a week to see if it would help me build whole body fascial resiliency. I wanted to feel if I could improve my ability to recycle energy from the ground to the rest of my body. When I started this daily practice my knees and hips hurt and single leg jumps were nearly impossible. I felt discombobulated. A couple weeks in, the knee and hip pain went away and I can now do all kinds of single leg combinations and I’m exploring other activities jumping rope transfers over to. So far my experiment has been a great success!
My feet, ankles and calves were pretty sore in the beginning, so I suggest you start with short sessions and progress slowly. Before you know it you’ll be able to practice everyday and walk through life with strong bones, a powerful heart and an efficient spring in your step.
Wetsuit
Have you ever worn a wetsuit or tried to take off wet clothes? It can feel restricting. Sometimes limited range of motion comes from multiple layers of tissue getting stuck together. In some cases it can be at the skin level through multiple layers of muscle and fascia down to the bone.
An athlete who was having a lot of hip pain and hip flexor tightness came to see me a few years ago. He was having trouble dropping in the hole on his olympic lifts and no amount of hip and thigh stretching and mobilizing had cleared it up. I assessed down to his shins where I noticed the skin didn’t glide freely over his tibia bones on both legs. This was limiting knee flexion and both plantar and dorsiflexion at the ankle. We focused a couple sessions on freeing the skin and superficial layers over his feet and lower legs and integrated it up to his hips.
Right away be was able to drop into a squat with ease. He attributed his bound shins to playing a lot of soccer throughout his life without wearing shin guards. He thinks years of kicks to the shins and ankle injuries caused the skin to get tacked down to the tissues and bone below.
Back to the wetsuit. Imagine wearing a tight wetsuit. Your deep muscles can be free and a mobile as ever, but the wetsuit will still limit your mobility or increase the effort it takes to move. The skin can be like a wetsuit. We want it to be mobile and somewhat separate from the surfaces below it.
Tattoos can also be limiting. Sometimes the needle literally stitches skin to layers below it causing a restricted range of motion in an adjacent area. For example, a tattoo along the lat muscle can limit overhead range of motion. It’s not permanent and can be easily freed up with some skin rolling or Instrument Assisted Soft Tissue Manipulation (IASTM).
The main take away is, like in the previous post, don’t overlook the superficial layers. Many people want to go straight for the deep tissue when it’s the surface tissue that can create limitation too.
Just below the surface
Your body doesn’t always need to be worked deeply in order to relax or decrease pain. In fact, the majority of pain causing nerves are in the superficial layers of the skin (called dermatomes). Deeper muscles often don’t have the same volume of nerves the skin has.
When foam rolling, stretching, using a ball or performing any kind self care, try to hold off on going for the deep dig right out of the gates by beginning lightly at the surface. Working on the skin and layers just beneath it can desensitize the major contributors to pain. As your perception shifts and breath expands you can go deeper, sifting through the tissues and refining the sensations you experience through your body.
If an area is too painful to work on without holding your breath or gritting your teeth, try backing out. Find the edge of the painful sensation and work the perimeter until the adjacent areas begin to ease. With time and patience your body will let you into those deeply held areas.
When we continually work too deep too soon, we may be by-passing and crushing the area that needs attention in order to unlock the area we intend to get to. If you find yourself always having to work on the same areas because they don’t seem to be changing, lighten up a bit. It is actually better if you can start lighter. When you have to back off, your body may have tightened up enough that it won’t let you back in for a while. In that case, take a break and come back to it with a lighter approach tomorrow.
Self-care takes patience and attention. Your body has many many layers. Treat it kindly rather than an inconvenience and it will guide you to the places you most need to release.
Creating options for movement and refining proprioception
Our bodies are capable of moving an infinite number of ways. The problem is we pick about twenty, we overuse them and we forget about the rest. When injury, pain or discomfort arises we often don’t know why and we don’t know what to do. A lot of us try to stretch where things hurt in order to keep moving the same way we’ve always been. While this approach often helps, but when it doesn’t we need to look for options.
Over the last 20 years I’ve worked with a lot of different movement and pain science models. Over the last few years I’ve adopted Til Luchau’s Advanced Trainings model of creating options for movement and refining proprioception. I’m am regularly surprised at how well his techniques and philosophy plug into my existing work.
Creating options for movement: Our bodies have tremendous possibilities for movement and places to move from. My passion is helping people discover and unlock options for movement by manually differentiating tissue layers both mechanically and electrically affecting both the nervous system and the brain. I also mobilize areas that don’t move that could and integrate them into the movement of the rest of the body.
Refining proprioception: Proprioception is the perception or awareness of the position and movement of the body. We don’t always want to increase perception. Sometimes it's about decreasing perception, especially when pain is involved. I do this through refining the body sense, helping it be more accurate. Bodymapping and movement integration is effective for accomplishing this. Refining proprioception can help shift a person away from perceiving pain to experiencing ease of movement and openness they may have forgot about long ago.
These two ideas have a lot of overlap. It’s not possible to separate them completely so I’ll be outlining specific examples in future posts.
Five minute meditation
People tell me they’ve tried to meditate but don’t do it because they aren’t able to clear their mind or they can’t stop thinking. This is all the more reason to meditate. A few minutes a day is all it takes to begin getting the hang of it without becoming overwhelmed or discouraged.
Five minute meditation: Find a comfortable upright sitting position. If you need to use a chair with a back rest, that is totally fine. It’s important to be comfortable. Start a timer for 5 minutes (or less if you need) and close your eyes. Feeling your feet on the floor, wiggle your toes a couple times. With your hands resting on your thighs, wiggle your fingertips a little bit. Take a full breath in and let it out. Keeping your eyes closed, continue noticing your breath as it flows in and out of your body. Breathe in a way that feels good. It can be deep and slow, it can be short and quick. It doesn’t matter as long as it feels good to you. If it stops feeling good find a new good-feeling breath. It may help to say “in” on the inhale and “out” on the exhale to settle your focus.
As you sink in your mind will probably wander, in fact, it will definitely wander, this is to be expected. When you notice your mind has wandered away from your breath, simply bring it back. No need to judge yourself for wandering off, just bring yourself back. This is the practice. The practice is bringing yourself back to the breath. The mind will clear itself over time as a result.
When your 5 minute timer goes off, use that moment to bring your attention back to your breath one more time by taking a good feeling breath in and letting it out slowly. Open your eyes, stand up and go about your day.
When you first begin practicing meditation this is all you need to do. Make a plan the next day to do it again. As you get the hang of it, you may want to add some time, a minute here and there is plenty. I started off with 2 minutes a few years ago and now I meditate anywhere from 20 minutes up to an hour or more everyday. I built up slowly.
If you ever wonder if you are doing it right, assume you are. Mentally respond with: “Yes I am!” you can even smile a bit. If you’re trying your best to focus, then you’re doing it right .
There is no right way to meditate. There’s only different techniques and teachers. Experiment with different styles. Some techniques will get you into a calm and peaceful state more easily than others based on your mental and emotional makeup. I change meditation styles every so often. Sometimes meditations with visualizations work better for me, other times I use more kinesthetically based body awareness styles. Look at how you learn best. If you learn best listening to instructions, try mantra meditations.
Over the years I’ve come to rely on breath based meditations as described above. It’s my default style. When my practice feels a little stagnant I’ll switch it up for a week or two. The main goal is to develop your inclusive attention and focus, creating and discovering your own path along the way.
Your sense of movement
You know the basic senses: sight, smell, taste, touch and hearing. But other senses are processed in the brain; proprioception and kinesthesia (where your body parts are and what they’re doing). nociception (feeling pain), thermoception (sensing temperature), chronoception (sensing the passage of time) and interoception (internal needs, such as hunger and thirst).
The kinesthetic sense tells you about your body: it’s position and its size and whether it’s moving and, if so, where and how.
Let’s do a simple experiment. Put a hand over your head where you can’t see it. Notice that you know right where the hand is, though you are not doing anything we ordinarily call sensing. Notice that you could describe in detail your hand’s position. You could say how the fingers relate to each other and to the palm, where the hand is in relation to your head or to the floor or whether there is a bend at the wrist. Now wiggle your fingers. Notice how much you know about the wiggling. You could say when you started, when you stopped, the speed, the sequence, whether the palm was involved, what joints were moving. Now imagine that your little finger grew four inches. Notice that if that were to happen you would know it from the inside. You would not need to look.
Notice something else before you bring your hand down. Look at your hand and notice that as you begin to use your eyes as your main source of information, that inner sense of its location fades. Now do the same experiment with your tactile sense—no longer look at your hand, but instead reach up and feel it with your other hand. Notice how you begin to rely on your second hand to tell you where the first one is.
So, working with me, if you do not already have it, we develop the ability to bring body feeling into consciousness in a comfortable, ongoing way. Most people experience this as a kind of coming home. There is a relief in it, in becoming embodied again. It turns out the effort is not in feeling our bodies but in not feeling them.
We live in a kind of sensory soup. There is a richness in this that is homey and gratifying for most of us. It’s essential for Artists. Artists with a reduced consciousness live their professional lives with a serious handicap. I believe we are all artists in some form or another.
This post was inspired by Barbara Conable’s book, How to learn the Alexander Technique and Sanjay Gupta’s book, Keep Sharp: Build a Better Brain at Any Age.
Definitions
I love studying movement, both movement of the body and movement of the mind. Ha! I say that as though they are separate. Are they? I was first introduced to Somatics in 1994, years before I learned any hands-on bodywork techniques. I’ve studied it in some form every day since then. I put together some common body work related definitions below.
Somatics - Describes any practice that uses the mind-body connection to help you survey your internal self and listen to signals your body sends about areas of pain, discomfort, or imbalance. These practices allow you to access more information about the ways you hold on to your experiences in your body. Somatic experts believe this knowledge, combined with natural movement and touch, can help you work toward healing and wellness.
Bodywork – Any therapeutic or personal development technique that involves working with the human body in a form involving manipulative therapy, breathwork, or energy medicine. Bodywork techniques aim to assess or improve posture, promote awareness of the “bodymind” connection or manipulate the electromagnetic field alleged to surround the human body and affect health.
Manual Therapy – Skilled hand movements and skilled passive movements of joints and soft tissue and are intended to improve tissue extensibility; increase ROM; induce relaxation; mobilize or manipulate soft tissue and joints; modulate pain; and reduce soft tissue swelling, inflammation or restriction. Techniques include manual lymphatic drainage, manual traction, massage, mobilization/manipulation and passive ROM.
Deep Tissue Massage - Usually focuses on a specific problem, such as chronic muscle pain, injury rehabilitation, and conditions like: low back pain, limited mobility, recovery from injuries, repetitive strain injury, postural problems, tension in hamstrings, glutes, IT band, legs, quadriceps, rhomboids, upper back. Deep tissue is often confused with deep pressure, with a common thought being “no pain, no gain.” I prefer the right technique coupled with the right amount of pressure, delivered to the right area in the right context.
Sports Massage - A form of bodywork geared toward participants in athletics and performance. It is used to help prevent injuries, to prepare the body for athletic activity and maintain it in optimal condition, and to help athletes recover from workouts and injuries. Sports massage has three basic forms: pre-event massage, post-event massage, and maintenance massage.
Massage – The manipulation of the body’s soft tissue. Massage technique are commonly applied with hands, fingers, elbows, knees, forearms, feet, or a device. The purpose of massage is general generally treatment of body stress or pain.
Swedish massage - One of the most commonly offered massage techniques. It’s sometimes called a classic massage. The technique aims to promote relaxation by releasing muscle tension. Swedish massage is gentler than deep tissue massage and better suited for people interested in relaxation and tension relief.
The work I do fits into each of the above boxes at different times. For the most part, I like to get the body moving any way I can using minimal tools and instrumentation while maximizing the use of my hands and ingenuity.
Scrunching the neck
Compressing the neck can be subtle. Compare the side by side images below. Look at one, look at the other then look at them together. Which one looks like it feels better to you? The larger image on the right is a nicely balanced cervical spine. The middle image is a great example of a neck that is pulled downward and a head that is pulled back. This type of scrunching has been shown to restrict movement and expression throughout the entire body.
Refer back to my February 1st post, Common imbalances associated with chronic tensing of the neck, where I list imbalances induced by downward pull starting with the eyes and leading all the way down to the toes.
Laws of the spine:
The head must lead.
The vertebrae must follow in sequence.
The spine must lengthen and gather in movement.
The movement should be equally distributed among the joints of the spine.
The spine either lengthens in movement or it shortens. Don’t take my word for it. Watch and watch. Experiment. Inquire. Mess around. This insight is worth anything it takes to understand it. When the head is leading and the spine following, all movement is organized and supported dynamically, and it is that organization and support that gives movement its breathtaking beauty and integrity.
Conable, Barbara. How To Learn The Alexander Technique. Portland, OR, Andover Press, 1995.
Redefining the neck and arms
The muscles of the neck are designed to be head turning muscles, not head holding muscles. Using your fingers, palpate underneath your jaw all the way around the back of your skull, this is the top of your neck. Next, palpate the bottom of your neck. Starting at your sternum, feel along the top of your collarbones out to where they meet the acromioclavicular joint. Turn the corner and continue palpating around the back of the neck just above shoulder blade level. This is the bottom of the neck. Everything in between the base of the skull and the collarbones and shoulder blades is head turning muscle, neck muscle!
Most people think their neck comes straight down, then they have shoulders, then they have arms. For people with chronic shoulder and neck tension, it’s often helpful to redefine the entire area so they only have head turning muscles and arms (refer back to The arm has 4 joints, February 14). I’ve asked clients to refrain from using the word shoulder for up to six months as we re-map and reframe the chronically held area. They are, however, free to have a glenohumeral joint. After a sufficient amount of mapping and freeing has been done, they can have shoulders again to see how it feels.
Next we’ll look at an example of a scrunched neck and and a free neck.
Beneath the jaw
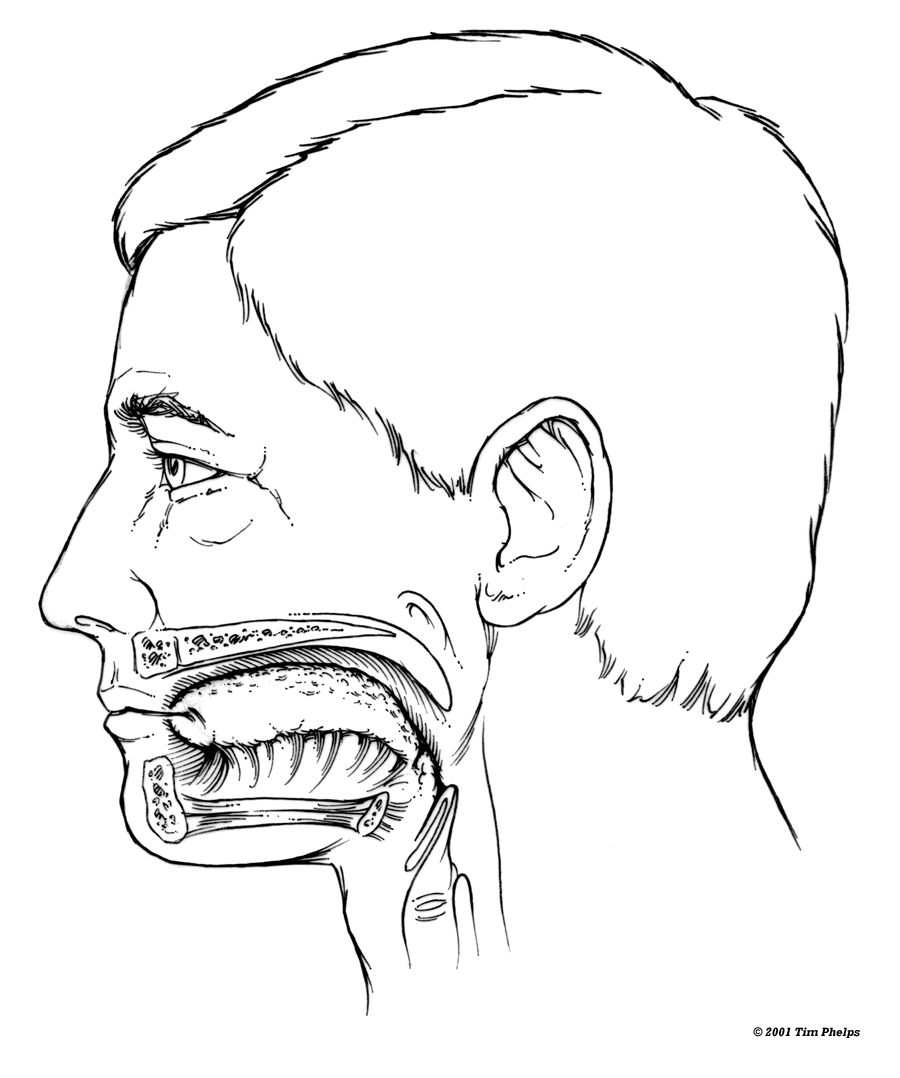
The image below shows underneath the jaw and throat with the skin removed. Look at how many muscles there are and h0w many different directions the fibers go. Many of them are tethered by the hyoid bone. It’s a horseshoe shaped bone anchored by muscles from the front, the back and below. It aids in tongue movement and swallowing.
It’s rare, but some people have their jaws mapped as solid bone underneath. Can you imagine? It would explain why they tilt their head back to open their mouths rather than lowering their jaw.
Tomorrow, we are going to redefine how we think of the neck and connect it to the arms. I need to get some sleep for this one.
The tongue
Most muscles serve to attach one bone, usually to via a tendon, to another. There are few places in the body where that is not entirely true: at the eyes, where the scapula and ribs meet, the diaphragm and pelvic floor. The tongue is also an exception. It’s a boneless mass that you can stick out at will. You can fold it, invert it, lay it flat or fill the mouth with it. The tongue is capable of a whole lot more when it’s mapped correctly and your neck is free.
You can refer back to an earlier post, Mapping the core of the neck (January 26th), where I point to the tongue in relation to how the head balances on the spine.
As the neck frees, the tongue can relax, not before. When the cervical vertebrae are jammed the tongue bunches and invades the windpipe from the front, affecting our ability to breath. All the more reason to keep the tongue in mind when freeing the neck. You can use your tongue to help free your neck. Curling it over to turn it backward in your mouth will place the tip of it right in front of the weight bearing part of the spine. As we covered in previous posts, this is where the head balances from. Not further forward and not further back. Right in the middle of our neck.
Tomorrow we’ll take a peak underneath the jaw.
Mapping and mismapping the jaw
Now that we know we only have one jaw, let’s find the joint it hinges from, the temporomandibular joint (TMJ). When asked to locate their TMJ, people show me a variety of different places. The image below shows some of the most common mismappings. The correct location is circled, the incorrect locations are marked with an X.
There are associated complaints involved with each mismapping. They range from pain in the cheek, jaw, neck, ears, teeth and even down to the shoulders and upper back.
Where are your TMJ’s? They’re right in front of your ears. Use your fingers to feel around for them. Open and close your mouth. Move your jaw forward and back and side to side. Once you’ve found your TMJ’s, explore the subtle gliding that occurs there. It will take some time to integrate this new map into your system. Be patient and curious. Spend a few moments a few times a day remembering, refining and exploring your TMJ’s.
Tomorrow we’ll map the tongue.
The 5th appendage
We have 5 limbs: two arms, two legs, and a jaw. Yes the jaw is a limb, an appendage just like the arms and legs. Being able to distinguish between the head and the jaw is crucial. Some people have two jaws in their bodymap. A lower jaw and an upper jaw. This orientation produces debilitating tension as they attempt to move their upper jaw in relation to the lower, to feel equal movement in both. When they get it that the upper teeth are in the skull, extraneous effort falls away.
How do you think about your jaw? Hopefully by now you know you only have one. Does your skull move upward when you open your jaw? If this were the case, imagine how tired your neck muscles would get when talking or eating. Singing would become impossible. Can you keep your skull still while you let your jaw drop open? It will take some practice, but your neck and the rest of your spine will thank you.
Now that we know we have a single jaw, let’s figure out where it moves from.
Connecting with the ground (part 2)
How long are your toes? Much like the hand, we often map our toes based on how they look covered with skin. Looking at the image below, you’ll see the outline of the skin in relation to the joints of the big toe. Reach down to your big toe and find where it bends from. Find the first joint and then find the second. As you bend and manipulate the toe from the second joint, notice how long it is. It’s often longer and has more movement than we allow it to have.
Using the image below, repeat this process with the other toes, noting they have one more joint than the big toe does. Pay particular attention to the third joint of these toes, where they bend from in relation to the skin webbing. Next, as you wiggle, move and manipulate your little toe, compare how long it is to how long you thought your big toe was. Often, clients will report experiencing all their toes as much longer and the whole of the foot as more open and moveable.
I hope you were able to transfer the process of mapping your fingers to mapping your toes. It’s a simple but powerful exercise. We may think we know how our toes and fingers move, but taking some time to investigate and scrutinize them can help create differentiation and springiness, bringing attention to dark areas we didn’t know needed light.
Now that we’ve mapped ourselves from fingers to toes, let’s map the head. We’ll start with the appendage known as the jaw.
Redefining the hand
Compare the two images below. Which image presents longer fingers? Sometimes we mistakenly map finger length based on how the skin covers the hand. This type of mismapping can lead to limited dexterity and mobility.
Look at your index finger and all the places it bends from. Examine the distance from the tip of your finger to the first joint you encounter, then the second and the third. Compare how the third joint of the index finger appears to bend at the top of the hand with the palm side of the hand. Looking at the palm side of your hand, mindfully bend the index finger a few times. See how far beyond the skin webbing it goes? That’s a nice long mobile finger. If you’re like me, the first time I experienced this, I felt like my fingers grew and what I thought of as my palm had shrunk. Repeat this process with the middle, ring and pinky fingers. When you combine this with our previous thumb mapping, you may discover your hand is a lot more mobile than previously imagined.
What is a palm? How big is it? How does it relate to the fingers? I think of the palm as any part of the hand that isn’t finger. When you look at the palmar side of your hand in this way, you may notice your palm isn’t much bigger than a quarter or 50 cent coin. It’s a small circle in the center of your hand surrounded by mobile finger joints.
Once you’ve mapped the thumb, fingers, palm and wrist of one hand, compare it to the other one. Note any difference in sensations, aliveness, mobility, size, length or anything else that enters your experience. After comparing, feel free to map the other hand.
Our hands are antenna. They reach into the world and deliver valuable information about the space around us. Redefining and refining how we think about and use them enhances and influences how we experience our lives.
As I mentioned in a previous post, Connecting with the ground (part 1), on February 12th, similar mapping can be done with the toes. We’ll exit the hands and map the toes tomorrow.